Credits
This guide was created by: dreamgoeson; Any critics/remarks are always welcome
Contributors: arimaa. – luuk_mr – ripmamba
Used guide by Schweeger as source material. Layout copied from gladiator guide by Dubshiro#0001.
Last edited on 26 September 2025
Hunter Community Class Guide
Attributes
Agility (AGI) – Increases Attack, Hit and Impale.
Stamina (STA) – Increases HP, Block and Evasion.
Technique (TECH) – Increases Armor, Crit and Tenacity
Recommended Attribute Set Ups:
Meta:
3 Agility | 0 Stamina | 2 Tech
*This is the recommended setup for attribute point distribution per level. This maximizes your Attack and Impale from Agility and also gives Crit through Tech.
302 is the priority, but you can go 303 if you have the points for it. You can reset attributes for 10 starfish, so dont worry if you messed up.
Tempers
HP – Increases total hit points to your HP Pool.
ATK – Increases attack damage.
ARMOR – Increases defense and reduces the character’s damage taken.
HIT – Increases hit rate or accuracy.**
EVASION – Increases evasion. (No damage is taken when attack is evaded.)**
CRIT – Increases crit rate of attacks and skills.**
TENACITY – Reduces chances of being hit by critical attacks and reduces its damage.**
BLOCK – Increases block rate. (Damage is reduced if attack is blocked.)**
IMPALE – Lowers chance of attack/skills being blocked and increases Crit Damage.**
** = Stat efficiency is affected by the level gap of your character and the boss’ level.
Recommended Temper Setup(s):
Attack/Crit/HP/Impale – Attack, Crit, and Impale all directly affect the damage that you will do as an DPS class, and as such should be your primary focus in any aspect of the game that allows you to choose your stats. HP is a great secondary stat as it adds general survivability.
Crit can be swapped with Armor if you see fit for more survivability.
Skills
Burning Shot: is an AOE skill that hits 3 enemies, applying a ‘Scorch’ effect and also reducing enemy healing.
Pan: Pan attacks once every 2 seconds for 22 seconds and increases Hunter’s Impale rate for the duration.
Sunder Armor Shot: is a single target damage ability that ignores 20% of enemy armor.
Flaying Arrow: is an aoe attack that gives a minor self heal.
Boar’s Rush: is a utility skill that stuns the enemy for 1 to 1.5 second(s) depending on skill level.
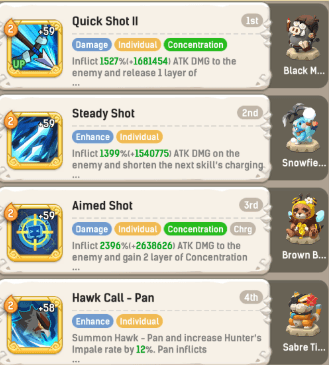
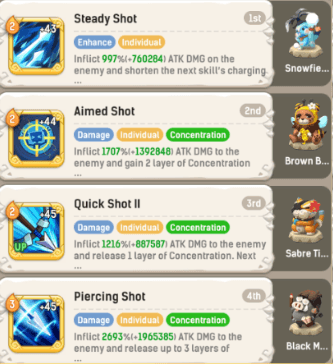
Aimed Shot: is a single target skill that gives two stacks of Concentration.
Piercing Shot: does massive single target damage, gaining 25% extra per stack of concentration.
Quick Shot: is a single target ability giving 1 stack of Concentration.
Volley: s a unique ability in that it can be either aoe or single target. Volley shoots 4 arrows in a row, each hitting different targets or they can all hit the same target for reduced damage per arrow.
Lunar Shot: is a single target ability that reduces targets healing by 16% for 10 seconds.
Storm Shot: is a single target damage ability
Steady Shot: is a skill used to shorten the following skills Charge timer by 60%.
Arrow Barrage: is an AOE ability, hitting every enemy on the field.
Multi-Shot: is also an AOE ability, limited to hitting 3 enemy units
Aspect of the Eagle: is a damage ability that also has a minor lifesteal effect.
Sheen: is a Hawk skill, summoning a single hawk that attacks once every 2 seconds for 22 seconds. While Sheen is active you also gain increased critical chance.
Weakpoint Shot: is a single target ability that does increased damage to low health targets.
Gal: is another Hawk that deals damage once every 2 seconds over 12 seconds, with increased damage per other hawk on the field.
Numbing Shot: is our first utility skill, dealing a bit of damage but also interrupting an enemy charge skill.
Explosive Shot: Does 20% damage to those affected by Scorch.
Scatter Shot: is a utility skill removing buffs applied to enemy targets.
Evolution/Upgraded Skills
Gal II: now summons 3 hawks instead of 1, but the duration of the hawks is lowered from 12 seconds to 10 seconds.
Storm Shot II: makes Storm Shot damage scale up from stacks of Concentration, giving a 20% damage bonus if at least one stack is present.
Lunar Shot II: increases the healing reduction from 16% to 24% for 10 seconds. Double the effect on non-players.
Weakpoint Shot II: adds a 5% damage bleed over 3 seconds per 10% of targets missing health.
Quick Shot II: now increases the next skill damage by 20%.
sidenote: It does look like this is a 20% base percentage increase and not a flat 20% increase to total damage.
Sunder Armor Shot II: Scales with Concentration stacks giving 5% armor penetration per stack.
Core Skill List
Core skills T1: Burning Shot, Explosive Shot
Core skills T2: Arrow Barrage, Multi-Shot, Quick II
PVP
PVE
Core skills T1: Piercing Shot (pre-statues), Quick (II), Aimed Shot, Steady Shot
Core skills T2: Steady, Pan (helps for rotation timing)
Core skills T3: Gal (II), Sheen, Sunder (II), Storm Shot (II), Weakpoint (II)
Situational Skills : Boar Rush, Numbing Shot, Scatter Shot and Lunar Shot
AFK Skills
For AFK skills, place Burning Shot first and then Explosive Shot. Best gains are when the wave is cleared before 20 seconds.
Toys
Priority TOYS
Black Moblin – ATK increases by 50% until the next skill
This toy is usually used on the highest damage skill you have equipped or the skill right before you transform. This skill is usually your highest damage skill anyway, like piercing.
Sabre Tiger King – Crit rate increases by 20% and crit dmg increases by 50% until the next skill
Use this …
Brown Bear – Resist 33% of the enemy’s armor until the next skill.
Use …
Snow Marmot – Gain 2 energy points upon casting a skill.
Usually used on the Steady Shot skill when using the concentration build. This allows for transform, followed up by steady Shot and immediately Aimed Shot in the span of a few seconds.
Bone Ankylo – Before next skill casts, immune to 1 fatal hit. It can be triggered twice per battle. Useful to prevent dying vs hard hitting bosses. Usually RNG bosses that have a random target for their skills.
SITUATIONAL TOYS
Unicorn Gorilla – Before casting the next skill, each basic attack will attack 2 nearby enemy units and inflicts bonus 100% DMG
Useful for afk setups and possibly AoE dummy.
Dandelion – After casting a skill, remove all debuffs/negative spells.
Really useful for fights where the AOE purge of your healer does not rotate fast enough.
Wind Dragon – ATK increases by 33% until the next skill
Rarely used, but could be useful in some cases.
—————————————————————————————–
Marmot – Gain 1 energy points upon casting a skill.
Used for timing purposes if you don’t have snow marmot yet
Moblin – ATK increases by 33% until the next skill
Used in same way as Black Moblin. Use this one until you get Black version
Pets
Pets are companions that do elemental damage while also buffing you. They have their own active skills that you can modify in the Pet Interface. Utilizing pets to their full potential is vitally important to succeeding in Ulala.
For detailed information about pets, refer to the pet guide
Elemental effectiveness
Every boss has a shield of a certain element. To damage this shield, you will have to use a pet with the same element as the shield.
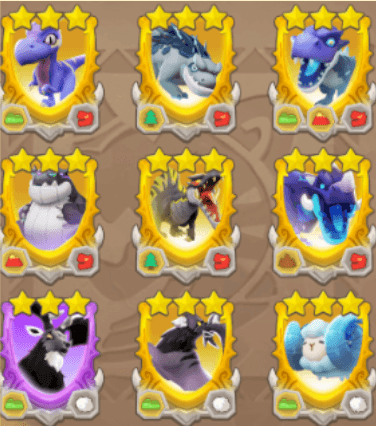
Hunter Clatter Cards (Fluff build)
Giant Jaw: 6 Pieces – Attacks gain 1 layer of Giant Jaw. Accumulate 4 layers and Basic Attacks will deal additional DMG of xx% of ATK at the cost of all Giant Jaw Layers. For each layer over 4,inflict extra DMG of xx% of ATK at intervals of 4 seconds. Up to 6 layers can be stacked. The effect is enhanced as the total ATK of Clatter Cards and Wishes increases.
Volcano: 2 Pieces – From Clatter Cards and Wishes Crit +20%
Woodland: 2 Pieces – From Clatter Cards and Wishes Impale +20% and Crit +20%
Plain: 4 Pieces – From Clatter Cards and Wishes ATK +20%
Fluff: 3 Pieces – For each battle, initial energy +1
Mountain Range: 1 Piece – Basic Attack DMG + xx%. The effect is enhanced as the total ATK of Clatter Cards and Wishes increases. (Valid only when one Mountain Range is present)
Transformation
Transformation is unlocked when all hero bonds have been completed. Transformation transforms your character into a transcendent being, releasing a powerful skill upon transformation while also immediately gaining 2 energy. To transform, you earn 9 aggression points per normal attack. Once your aggression gauge reaches 100, transformation is then triggered. It is important to understand that even if you have full energy and are about to use a skill, if your aggression gauge hits 100 as you are about to use a skill, transformation will take priority and will occur first prior to using that skill wasting the free 2 energy.
Terminologies:
Transformation – Act of Transforming upon hitting 100 aggression points.
Whirlwind – Skill used immediately upon transforming.
Gifting Points/Aggression Points – Points gained per normal attack before transforming used to transform.
Rage Points – Points obtained after transforming gained by normal attacking and is used for ‘Secret’ attack. Resets back to zero once Secret has been used.
Secret – Skill used upon gaining 100 rage points. Can be used multiple times in a fight as long as 100 rage points is gained.
Charge Points – Gain charge points if using Support crystal. Support crystal used upon gaining 100 Charge points.
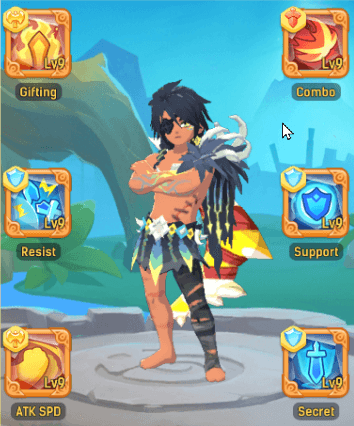
Recommended Hero Crystals:
Gifting Crystal – Increases gained Aggression points per skill use. This will increase speed at which you transform and use Secret. Very important to increase; however, you do not want to have the timing far off from the rest of the team.
Combo Crystal – Increases Whirlwind damage depending on quality. The higher the quality the better the damage effects will be. Certain qualities also add extra effects for even more damage.
Secret Crystal – Skill used upon gaining 100 rage points. This skill does a large amount of damage depending on quality
Resist Crystal – While your tanks are alive, damage received is reduced by 21%. Survivability
Support Crystal – Every 2 basic attacks that crit, dispels one buff from the target
ATK SPD Crystal – Increases attack speed by a small margin. Slightly faster rotation
Optional Hero Crystals:
Piercing Crystal – Ignore the enemies level by a certain amount. This reduces the level gap between yourself and the boss affecting the chance for things such as: Your crit, the boss’ crit, block, evasion, interrupt chance, hit, and impale. Additionally, it also increases all damage output.
Shield Crystal – Gain a shield based on percentage of max HP at the start of the battle and lasts 10 seconds if not burned through.
Survival Crystal – When HP is below 30%, immediately gain a shield equal to a percentage of your max HP and lasts 5 seconds. Can only be triggered once.
Purge Crystal – Every x number of attacks clear 1 random debuff.
Charging Crystal – Allows for an extra secret cast and faster rage gains (requires secret crystal to work). Can be used until gifting crystal reaches level 9
Attribute Crystals:
Crystal names:
ROW1
Attack/Block Crystal IV
Crit/ATK Crystal IV
Impale/ATK Crystal IV
ROW2
ATK/Armor Crystal
Crit/ATK Crystal III
Impale/ATK Crystal III
ROW3
HP/ATK Crystal IV
Crit/Impale Crystal IV
Armor/Impale Crystal IV

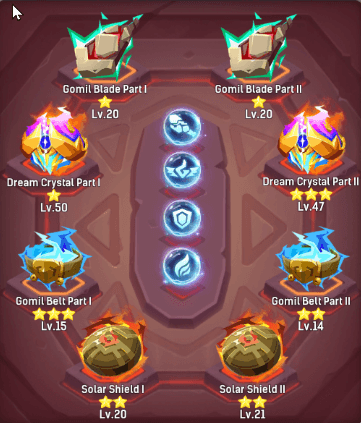
Giant Abilities:
Gomil Blades
Individual pieces do rune damage to the enemy.
Set: reduces the enemy’s healing
Dream Crystals
Individual pieces do rune damage to the enemy.
Set: 15% extra crit rate and we love crits
Gomil Belts
Individual pieces give shields and damage reduction
Set: 2 second immunity when receiving a hit that would otherwise have killed you. Can only trigger once per battle!
Solar Shield [Rate Up event only]
Individual pieces do rune damage to the enemy and grand the owner a shield.
Set: heals you when falling below half hp and removes all debuffs over 2 seconds. Can only trigger once per battle!
Holy Vessels (statues):
Statue names (supernal rarity):
Beast Statue (soul beast arrives) | CORE STATUE
Slaying Statue (familiar claws) [Meow-Ha] | CORE STATUE
Soulhunt Statue (soul arrow) [Meow-Ha] | CORE STATUE
Giant Herast Statue (toxic fruit) [Summit Season store]
Shooting Statue (serial penetration)
Focus Statue (precision shooting)
Unity Statue (heroic blessing) [Meow-Ha]
Guerrilla Statue (wind and rain of arrows) | CORE STATUE (AoE dummy)
Totem priority
Beast statueSlaying statue
Soulhunt statue
Shooting statue
Unity statue
Focus or Sniper
Change with guerrilla when doing black rex dummy
Best skill rotation (early- mid game)
Quick Shot (BMob)
Steady Shot (Snowfield)
Aimed Shot (Bear)
Hawk Call Pan (Tiger)
For epic and legendary statues, focus on statues that give you the most attack in the moment.
For ancient statues, see what sounds like a good one to you. No one will have the exact same at the same time
Hero Training Ground (no statues):
Single Target
Hero Training Ground with Statues:
Single Target